INTRODUCTION To AMP
Developers always innovate new techniques which improve and enhances the working experience of the users. One of the problems which were faced by the users was the loading time of mobile pages because developers were working on the web pages. To delete the problem, Google and WordPress come across and try to solve this problem by introducing the concept of AMP WordPress. AMP stands for Accelerated Mobile Pages. As the name suggests, it is used for increasing the speed of the mobile pages. You have to install the AMP WordPress on the web page and accelerate the loading time of the mobile page. Not only this, but it also helps in improving the ranking on the Google result page.
Do Check: WordPress Plugins That Help In Leg Up Competition
AMP WordPress
Now, people like to surf web pages on their mobile phones and tablets which increases the demand of website on the website. Usually, websites were designed for laptops where this loading time was not the problem because the developers use techniques. But, those techniques are not applicable for mobile phones so the concept of AMP is introduced.
AMP WordPress is a feature which helps in displaying the web page on the mobile phones. It is a feature which cuts down the additional feature on the web page and shows the necessary content on the mobile phones. When AMP is started then Google displays the AMP cache version pages when users click on the result websites on the result page. So, AMP cache is very important to be installed on the WordPress.
It is beneficial in decreasing the loading time of the website. But sometimes, it irritates the user. It function on the concept of minimizing the HTML and Java coding which in result full web page is not visible the user. It harms the features incorporated in the web page. Sometime, it doesn’t show the extra feature which is soul of the web page and made it useless.
There is one more problem is faced by people is that if they don’t turn on the activation feature of the AMP cache then it will affect the ranking of the website. But still the relevancy of the AMP cache is not diminished with the time. Its importance is still present in the accelerating the loading time of the website.
Do Check: Ways To Protect Your WordPress Blog
Installation of AMP WordPress Plug-in
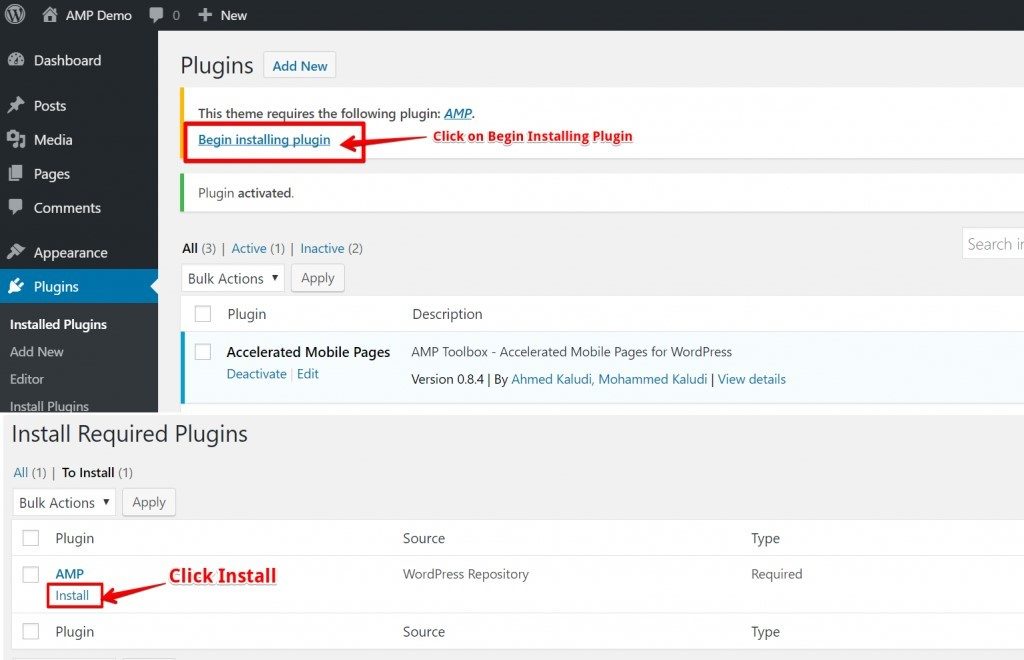
You might be thinking how and where to install the AMP plug-in then this article will clarify all your doubt with the help of simplified steps and pictures.
Steps for installing the AMP plug-in-
- First of all, go to but the website’s dashboard then
click on the plug-in option. - Click on Add New option and search for Google AMP WordPress plug-in. There you can install the plug-in.
- Now, you can see the AMP cache will be shown on the Plug-in list, there you have to click on the Activate option then it will start working.

After this, it’s the time for checking whether the plug-in is working or not. If the blue icon is visible on the web page then it is properly installed and if not, install the plug-in again. It is always better to use Google AMP WordPress plug-in besides third party built plug-in hence, it increase the website ranking and work efficiently than other third party plug-in.
If you are worrying about that you are using Google approved plug-in then you can go to Google chrome and install the AMP validator extension. It will work automatically on your website’s pages. You need not to do anything.
